Fitting The Rider:
This way of fitting the rider is specific to our saddles. Most western saddles have a built-up seat in the front and often require a larger seat size. We discourage oversized seats to keep you forward and over the horse's balance point, but still be comfortable and properly aligned for the type of riding you do. We encourage you to ride with as long of stirrup length as possible, we want to make sure we make you the proper stirrup leather and fender length.
*If you are interested in one of our saddles use the following lists and pictures below for how to measure the rider and make tracings of your horse/mule or group of horses/mules.
For the Rider we will need:
Thigh Measurement: (please send us a picture of the ruler on your thigh so we can verify the ruler is in the correct place and see the measurement)
Leg Length out of your stirrups: (please send a picture of the tape measure running down the inside of your leg so we can verify in the correct place and see the measurement)
Stirrup Length you are currently riding: (please send a picture of the tape measure running from the center of your saddle seat to the stirrup to see the measurement)
Rider age
Rider height & weight
Rider shoe size
Type of Riding & If you rope
Email a picture of you sitting in your current saddle from the side where we can see all of the rider and horse.
For the horse/mule or horses/mules we will need:
Name of Horse/Mule
Breed of Horse/Mule
Age of Horse/Mule
Tracings: ((please send a picture of where you placed the fitting wire over the withers and for the rocker so we can verify the correct placement)
Email a picture of the whole horse from the side
without a saddle, not too far away.
How To Measure Yourself for an OWS Saddle

Thigh Measurement:
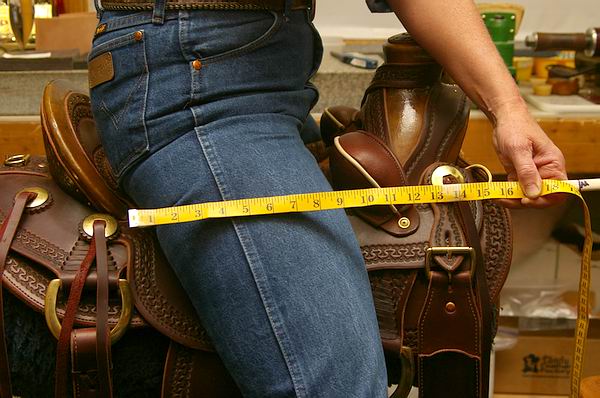
sit in a saddle, on a horse, with your legs out of the stirrups, with your upper legs as straight down as possible. Very important is your heels need to be in line with your shoulder! To help get in that position, over-stretch your upper leg way back then relax. *Don't bring your heel in line with your shoulder by bending the knee. How you sit and position your body makes a big difference in the seat size you need. We are most concerned with the size of your thigh at the point where the base of the cantle and the fork meets the seat of the saddle. *Example picture shows a 9" thigh. Most saddles with built-up seats encourage/teach you to sit back on your pockets, your knees/legs more forward and your stirrups shorter which requires a bigger seat. We believe a saddle should make it easy for you to ride centered, over the horse's balance point like where you would sit if you were riding bareback, your weight should be on the inside of your thighs and your feet, not your pin bones and knees. It may feel strange and take a little retraining of your muscle memory to sit more centered/straight but it is sooo much more comfortable for you and the horse once you get used to it, for most people it is a quick process!!
Send a picture where we can see all of the lower body and of the tape so we can verify the measurement.
You want a fingers thickness space between the bucking rolls and your thigh. Ropers sometimes like a little more space.

Leg Length:
Sit in a saddle, on a horse, with your legs out of the stirrups, with your upper legs stretched down as straight down as possible, ideal is your heels in line with your shoulders, not by bending your lower leg. Place the tape measure at your inseam and run down the inside of your leg to the edge of the ball of your foot with the type of riding boot on you usually wear. It is best to have someone read the tape for you!
Send a picture where we can see all of lower body and of the tape so we can verify measurement.
Stirrup Length you are currently riding: measure on the saddle you are riding from the center of the saddle seat down to the stirrup. Send a picture for verification.
Fitting The Horse:
This is critical for the horses comfort, attitude and being able to perform to their maximum potential without interference from the saddle.
Use the how-to video and pictures below for guidance on how to make a tracing of your horse's withers, rocker, and top line.
How To Make Tracings Of Your Horse's Back

How To Take Tracings of a Horse/Mule Back:
The horse needs to be on level ground with all 4 feet flat on the ground with the head in a normal riding position when you take the following tracings.
There is no perfect way to fit a saddle to a horse/mule but we have found this to work really well for us and our customers! We don’t encourage one saddle for a horse, they change just like us! We help you choose the best saddle bar angle & rocker shape for your horses/mules. Our Remuda Saddle Fitting Pad sets you up with a very versatile saddle that will fit many horses/mules of all kinds. We will take into account if we see any muscle atrophy in the withers or if their top line/spine is dropped, you want a saddle that gives the horse room to fill back out to how they should be not how they are if possible.
First you have to determine where the “sweet spot” is located. This is right behind the shoulder blade where the front of the bars of any tree Western or English is meant to go. It is soft. Some horses it is easy to see especially if they have some muscle atrophy there.....this horse you can only feel but not see it.

Proper saddle/tree placement:
*This is showing the front of the tree bar going right behind the should blade which is critical as the entire tree shape/design is meant to go there. On a finished saddle it is fine if the leather from the saddle goes beyond this point in front, in the back you don't want the leather to go past the cowlick on the flank as that will cause it to go up on the hindquarters and cause bridging, where pressure is in the front and back of the bars but not in the middle, which causes pressure points and pain.
You will need a saddle fitting tool! We highly recommend using a 24” piece of 12-2 Romex housing wire (has just the right amount of flexibility but holds its shape), FLEXIBLE RULERS ARE NOT ACCURATE they are too flexible and don't hold their shape! On the Romex wire put black electric tape on the ends, mark left/right & front/back on the ends. This process is called lofting, Bob learned this in boat building in his past. You can buy one of these "high tech" saddle fitting tools from us for $10.00 or make your own. Many electricians have scrape or many hard ware stores sell it by the foot.

Wither Tracing:
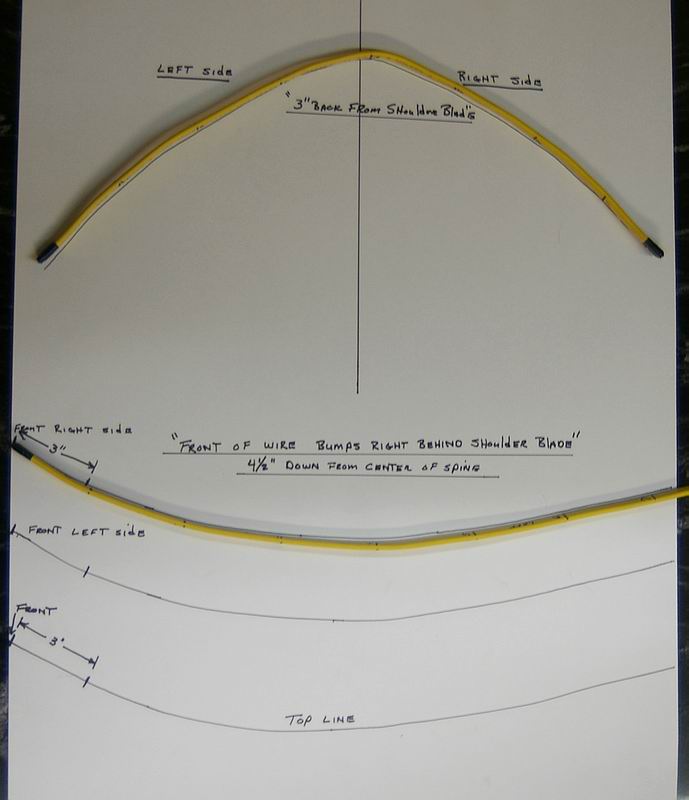
Shape the wire over the withers, 3” behind the scapula/ “sweet spot”. Take your time and make sure the wire is exactly the same shape as the horse. Lay the wire on a piece of paper and trace the shape......see photo. You need to label left/right on the paper.
TIP: Put a piece of vertical tape or a vertical chalk line 3" back from the scapula on each side as a guide for where to shape the wire.
**Send us a picture of where you placed the wire and how you shaped it to help verify accuracy.

To help this make sense, we drew the shape of the saddle tree bars onto the horse so you can see the idea. On most saddles, if you search a little, you can see the front end tip of the tree bar and feel underneath the sheepskin for where the rest of the tree bar is located.
Rocker Tracing:
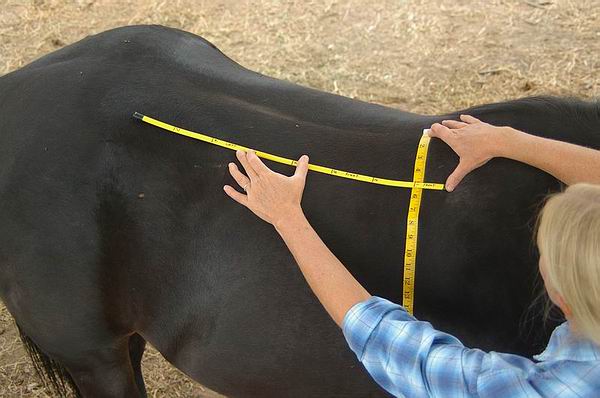
Rocker = The shape/curve of the back from the scapula to the flank/cowlick area. Saddle tree bars have different rocker shapes, some straighter/flatter, some more arched/curved.
You bump the wire right behind the shoulder blade in that “sweet spot” 4” down parallel to the spine/center of back. Lay the wire on a piece of paper and trace the shape......see below. You need to do both sides and label which is front/back, which is left/right.
TIP: Put a piece of tape 4" down from the spine as a guide where to place the wire to shape it.
**Send us a picture of where you placed the wire and how you shaped it to help verify accuracy.

Here again, you can see where we are taking the tracing relates to the saddle tree bars which is the most important part for the horse. All of your weight is distributed on these bars and you want as close to 100% in contact as possible otherwise, you get excess pressure points that are painful.
Top Line Tracing:
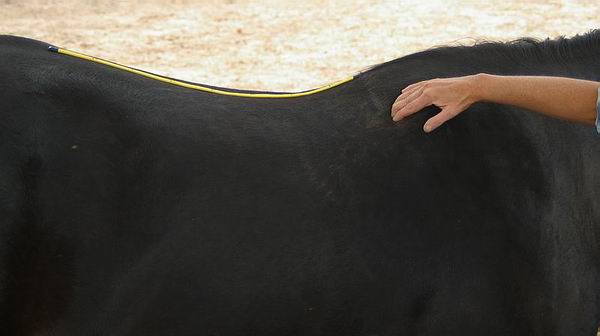
Place the wire in the center of the spine with the end of the wire even with the “sweet spot”. Lay the wire on a piece of paper and trace the shape......see below.
Tracing Wire Shapes Onto a Piece of Paper:
Any paper will do as long as we can read it. You can even piece/tape together grocery sacks or newspaper! Now you have a record of your horses back! You can do this for each horse or mule and then compare them to see how much they are alike or different. It is good to recheck this several times in a riding season as the horses change with exercise etc. You can add new updated tracings to the same paper and date each one and watch for improvement or see if the problem is getting worse.
Checking Saddle Fit: Any Saddle, Any Horse:
Ideally, you want 100% of the whole surface of the tree bars in contact with the horse's back so the weight and pressure are evenly distributed over a large surface for maximum comfort, fit and stability on the horse's back.
*If the horse/mule has muscle atrophy behind the withers or a dropped top line you DO NOT want the tree to fit an unhealthy back or they can never be comfortable or use their body properly. You want the tree made to fit how the back SHOULD BE!
Once you have the shape of your horses back in the wire (where we explained), you lay the wire in any saddle (where we explained) and check to see exactly how it is fitting your horse. This takes all the guesswork out of saddle fitting, you can see exactly how the whole tree is fitting. This will work with any type of saddle English or Western on any horse or mule! Armed with your wire and your paper with the tracings of the horses back you can go to any saddle in say a tack shop, turn it over and see what kind of contact/fit you would have. You can take your horse with you to go saddle shopping!
**We can’t stress enough the first thing you MUST look for when taking the shape of your horses back is to decide if the shape is HEALTHY?? The majority of horses we see have some degree of muscle atrophy/dished in withers and their top line is dropped from being ridden with saddles that the angle of the tree bars is too narrow and possibly the saddle is too long or the rocker shaped is incorrect.
When a saddle is pinching a horse in the withers the horse will tend to hollow his back/drop his top line, bring in the shoulders, short step, hold head up higher and not want to use their hindquarters to get away from the pain. Setting them up for bad confirmation and unable to use their body comfortably and correctly. Ill-fitting saddles will DEFORM a horse’s back to the shape of the saddle they are forced to wear! Many people think dipped in/distinct withers is a sign of “good/high withers” or there is some “Thoroughbred” in them and that “they will hold a saddle well” where in fact the majority of the time they have a damaged UNHEALTHY back!
You DO NOT want a saddle to fit to the shape of a DAMAGED back or they will never have a chance at a healthy back.
If you realize there is a problem, shape the wire to what the withers and rocker should be shaped like not how the horse is and then evaluate the saddle to see if there is enough room for their shoulders to fill out and their top line to come back up. At first the saddle may be too wide and the rocker angle too straight but you can correct that with using our remuda saddle fitting pad and put shims to fill in until their back recovers if they are able to or permanently if necessary.
Checking The Wither Angle/Shape:
it helps to have someone hold the skirts down out of the way, then just lay the wire in the saddle 3” back from the end of the tree bars which is the same place as on the horse (3” back from the shoulder blade). Don’t push down on the wire just lay it in and compare the horse (wire) & the saddle tree bar angle.

Improper Wither Angle/Shape:
This is what we see with 90% of the western saddles made today! The angle of the tree bars is too narrow! All the pressure is put in only about 40% of the bars, near the backbone there is no contact.
Many saddle makers in an attempt to correct this have made the gullet width wider but leaving the angle the same which just puts the pressure point lower down on the withers, causes the saddle to want to sit “down hill”and then you also can have a problem with not having enough clearence/gullet height hitting the wither on some horses.
Depending on how deep that gap is our remuda saddle fitting pad can correct or at the least improve the fit to a point. In this situation, you would put inserts in the middle and back NOT the front pockets.

Proper Wither Angle/Shape:
As you can see the horse (wire) shape/angle is the same as the saddle tree bar angle where you have 100% percent contact! The shoulder blade can rotate under the bars. The horse will want to take longer strides, want to round their back and collect without pain or restriction!

Improper Rocker Angle/Shape:
Here the horse has more dip/curve to his back than the saddle bars. We see this often also due to horses dipping/dropping their top line in an attempt to get away from the pain of an ill fitting saddle. This can be corrected up to a point with our remuda saddle fitting pad. In this case if it is the only problem you would put shims in the middle only the same thickness as your gap.

Proper Rocker Angle/Shape:
Here the horse’s back shape and the tree’s shape are the same giving 100% contact, no pressure points!
Below is a video clip on how to use our therapeutic saddle fitting pad the "The Remuda Pad" to help, if not solve, saddle fitting problems.
Proper Saddle Placement:


Saddle Length:
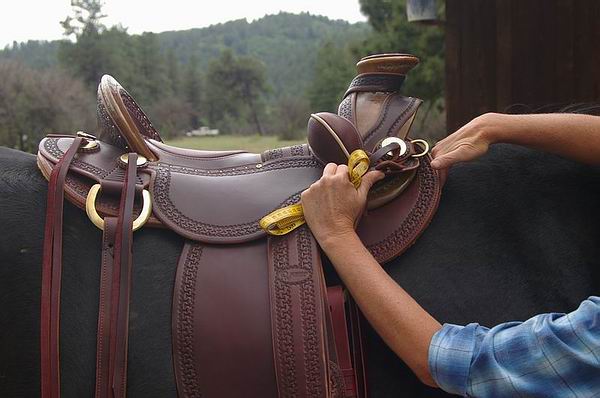
This saddle is 24” long. With any saddle on your horse in the correct forward position with the saddle tree bars right behind the shoulder blade as shown above....measure straight across from the front of the tree bar to the longest point of the leather in the back running the tape at about the base of the cantle to the base of the fork. This is how you determine the overall length of a saddle.
*To determine the maximum length a saddle can be for a horse measure the same way with a saddle on in the proper position but run the tape from the front of the tree bar to the center of the cowlick.
Nothing including the leather in the back should go past the center of the “cowlick” (at the flank where the hair goes in the opposite direction). If the leather does go past this point the saddle starts riding up on the hip/hind quarters, is too long, will interfere with the hindquarters, will tend to “bridge” where most the of the pressure will be in the front and the back not in the middle which will cause pain from pressure points and rubbing the top of the hindquarters. Interfering with hind quarters besides being painful will inhibit things like proper propulsion, turning and stopping. Bob likes to say it is driving with your brakes on or running with your pants down......you can do it but it isn’t easy!

Here you can see using the tape as a line only there are several inches before the saddle touches the “cowlick”. If the only saddle you can measure is too long tell us how many inches past the cowlick the saddle goes.
Rigging Position:
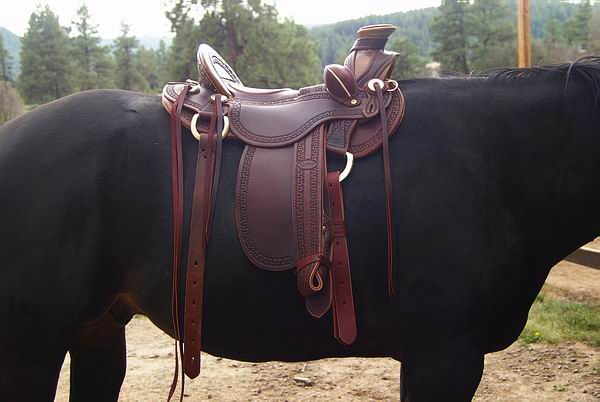
This picture is showing an example of the rigging position being a little too far back, the saddle will tend to want to work its way too far forward. We find the 7/8 rigged position to be the most universal.
**Horses of all breeds in general have gotten wider, flatter and shorter in their back shape over the last few decades! The majority of horse owners and the saddle making industry including custom makers have not realized this change. We are also finding there are so many damaged backs now the industry see these unhealthy shapes as “normal” and continuing to build saddle trees to that shape which is encouraging the problem to continue and get worse.
See also our Saddling Fitting Information/Philosophy page!!
We hope this information will be helpful to you and your horses/mules! If you have any questions please give us a call. It is our passion and goal to help as many horses as possible to become pain free from saddle fit! They are a gift in our lives and deserve the best and to be comfortable!!
